Sunday, October 25, 2020

ROCK PAINTING TUTORIAL #4 - "Little Boy in a Bunny Costume"

 Little Boy in a Bunny Costume


Thank you for being here for this rock painting tutorial!


'Little Boy in a Bunny Costume'
by nancymaggielee


By using my methods, anyone can learn how to paint rocks and turn them into beautiful decorative pieces of art.  I sure hope you will give it a try!

In this tutorial, I will lay out for you step by step through outlines, video demonstrations and links to articles how I took an image (pictured below) and transferred it onto a rock.  The result is the rock in the image above.

Sidenote:  The videos or articles showing the process for this tutorial, 'Little Boy in a Bunny Costume' may use different images.


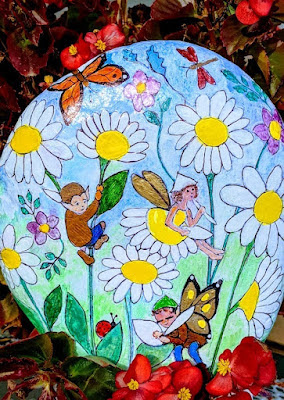
This is the picture I used to transfer to my rock
for a base image to embellish


There may seem to be a lot of steps, but the process is fairly simple.  You will be using Mod Podge gel medium to coat the image and let it dry onto the surface of the rock.

Also provided will be a list of supplies I used with links to where you can purchase them online for your convenience.  Just as a sidenote, you can also purchase most of the supplies used in this project tutorial at your local craft store.

Please note that you may not need all of the supplies I included in the list below, but I wanted to include links to additional products to give you a choice and to demonstrate the wide variety of products that can assist you in creating beautiful painted rocks.


Before you transfer the image, you will need to do a few things to prepare your rock for the transfer of the image…

1.  Find a rock you want to paint, wash and dry your rock.
2.  Paint the rock with at least two coats of white acrylic paint.
3.  Select a picture you would like on your rock and print it out onto freezer paper.


Read "Learn How to Find and Print Any Picture from Your Computerlinked here (and below) to learn more about where you can find prints for your rock.

After you find a picture you would like to transfer, you will have to download it into a word processing document using a simple copy and paste method which you can learn about by clicking the links below this paragraph.

Printing Commands Tutorial for Printing onto Freezer Paper
(also calledLittle Boy in Bunny Costume Rock - PART 2 - "Printing Extra Flowers onto Freezer Paper")


Are you ready rock painters???  Let's get started...here we go!


DIRECTIONS:

Read and follow the written directions in each STEP, and watch the videos linked in each STEP below for visual demonstrations.

Make sure to refer to the articles and videos linked above the DIRECTIONS BEFORE moving forward. 

_____________________________________________________________

STEP #1

In this video, I explain how to take a picture from the internet (Pinterest), and by using my simple copy and paste method print out the image on an inkjet printer. I downloaded a picture into a word processing document so that it could be resized and reformatted easily. You can use this method to print out most any picture you can find online.

Watch the video below and after following the directions, then move on to Step #2...

"Downloading Image into Word Processing Document"


_____________________________________________________________


STEP #2

In this video I will demonstrate the print commands for printing on a piece of freezer paper that you will have manually placed into the rear tray of your inkjet printer.

I filmed this in real time with my phone, so I apologize for the shakiness of the video. In any case I hope that you will find it helpful and informative. 

Using ordinary kitchen freezer paper is a great way to get an awesome transfer of ink onto another surface, in this video I am using freezer paper to transfer an image onto a rock.

FYI...If you don't have freezer paper, I would just like to say that the image transfer method outlined in this rock painting tutorial also works using regular computer paper. The freezer paper works better, but both will work well.

You can buy pre-made freezer paper for your computer (also linked below in ‘RELATED VIDEOS' section) if you don't want to go through the process of making your own sheets and attaching them to computer paper to print.

However, if you would like to learn how to make freezer paper sheets for your computer, watch this video which will also be linked below (in the ‘RELATED VIDEOS' section). I believe that this is a more cost-effective way to go, but it's up to you.


"Printing Extra Flowers onto Freezer Paper"


_____________________________________________________________


STEP #3

In this video I will demonstrate how I took smaller pansy images that I had printed on freezer paper and added them to the outside edge of my rock.

Adding flowers to the edges, in my opinion, gives the painting more depth.  It makes it look as though whoever is looking at the painting is seeing it from a distance, in other words peeking through the flowers in the meadow to see the bunnies and butterflies.


"Adding Additional Flowers with Mod Podge"


_____________________________________________________________


STEP #4

In this video I will demonstrate how to peel the paper back to reveal the images.  Computer paper has about 7 layers, freezer paper too.  While this process takes a while to get a great transfer of ink to the rock, it also takes great patience.


"Revealing the Images"


_____________________________________________________________

See Also...


"How to Make Freezer Paper Sheets for your Inkjet Printer"


"How to Print on Freezer Paper from the Rear Tray of your Printer"


(same video as PART 2 above)


How to Transfer an Image to a Rock Using Freezer Paper, White Paint and Mod Podge!

Learn How to Find Pictures on Your Computer, Resize and Print from a Word Processing Document

Where Can I Find Rocks to Paint on?

Using a Stencil to Transfer a Design to a Rock


SUPPLIES:  (Not all are needed)

8.5 "x 11" Freezer Paper Sheets https://amzn.to/39zebEZ (*optional)

Reynolds Kitchen Freezer Paper https://amzn.to/2TTT1M6

Double-Sided Scotch Tape https://amzn.to/3bQM1Xw

Rocks for Painting https://amzn.to/2YmClyT

Inkjet Printer https://amzn.to/391bXx7

Computer Paper https://amzn.to/3ir89L1

Mod Podge Matte Gel Medium https://amzn.to/2Xh1idD

Painting Flowers on Rocks https://amzn.to/2Zwl87g

White acrylic paint https://amzn.to/3b4d00G

Paintbrushes https://amzn.to/3d6uScL

Arteza Paint Pens https://amzn.to/3cqpEYt

Sharpie Permanent Markers https://amzn.to/3eStQ4a

Sharpie Ultra Fine Black Marker (for outlines) https://amzn.to/2DOIkot

Art Markers https://amzn.to/30waJIX

Shuttle Art Markers https://amzn.to/31p8SoI

Peel and Stick Flower Stencil https://amzn.to/2C83JZo

Leaf and Ivy Stencil https://amzn.to/3km2vv7

Deco Art White Paint Pen https://amzn.to/2DzQX6D

Paint Markers https://amzn.to/2XGYzep

____________________________________________________________

Supplies Sidenote:   Not all of the above products will be needed for this particular tutorial. I have linked to some supplies that I use in my rock paintings so that you can have access to some of my favorite products, but you can find most of these in your local craft store.


Here are the links to other rock painting tutorials on this blog:


ROCK PAINTING TUTORIAL #1 - A Basket of Pansies


ROCK PAINTING TUTORIAL #2 - Gardening Animals


ROCK PAINTING TUTORIAL #3 - Red & Orange Poppy Flowers


ROCK PAINTING TUTORIAL #4 - Little Boy in a Bunny Costume


ROCK PAINTING TUTORIAL #5 - Mama Bird & Chicks


ROCK PAINTING TUTORIAL #6 - Fairies & Bunny Spring Rock


ROCK PAINTING TUTORIAL #7 - Beach Bunnies Family Rock


ROCK PAINTING TUTORIAL #8 - The Candy Corn Family


ROCK PAINTING TUTORIAL #9 Daffodils Rock


ROCK PAINTING TUTORIAL #10 - Fairies & Daisies


ROCK PAINTING TUTORIAL #11 - Strawberry Fairy Rock


ROCK PAINTING TUTORIAL #12 - How to Paint a Rock Using a Coloring Book Page


ROCK PAINTING TUTORIAL #13 - Daisy Flower Rock


ROCK PAINTING TUTORIAL #14 - Stained Glass Angel Theme


ROCK PAINTING TUTORIAL #15 - Fairies in Love


Please visit my other blogs (click link below each blog's cover picture)...


Saturday, September 26, 2020

ROCK PAINTING TUTORIAL #2 - "Gardening Animals"

Gardening Animals

Thank you for being here for this rock painting tutorial!


Gardening Animals Rock by nancymaggielee


Hello!  I'm so glad you're here!

By using my methods, anyone can learn how to paint rocks and turn them into beautiful decorative pieces of art.  I sure hope you will give it a try!

If you would like to create a rock from an image similar to my 'Gardening Animals Rock' pictured above, please refer to the DIRECTIONS section below on this page.

Here in this tutorial, I will lay out for you step by step below through outlines, video demonstrations and links to informative articles in which I will show you how I took an illustration of these cute little animals and transferred it onto a rock.

After the picture was transferred to the rock, I used art markers to color over the transferred ink to create a unique one of a kind rock painting.

Also provided below will be a list of SUPPLIES I used with links to where you can purchase them online for your convenience.  However, you will also be able to purchase most of the supplies used in this project tutorial at your local craft store like Michaels. (click for link to weekly ad coupon).  

You will not need all of the supplies included, however, I wanted to include links to additional products to give you a choice and to demonstrate the wide variety of products that can assist you in creating beautiful painted rocks.


I Paint Rocks
What's Your Superpower?
(Click link above for more info)


Before you transfer an image like the 'Gardening Animals' image, you will need to do a few things to prepare your rock for the transfer of the image...

1 Find a rock you want to paint, wash and dry your rock.

2.  Paint the rock with at least two coats of white acrylic paint.

3.  Select a picture you would like on your rock and print it out onto freezer paper.

Are you ready rock painters???  Let's get started!

Read "Learn How to Find and Print Any Picture from Your Computerto learn how you can use almost any picture you can find on the internet to transfer it to your rock.

After you find a picture you want to use, refer to the video series about "How to Transfer an Image with White Acrylic Paint and Mod Podge" (videos linked here) and also down below on this page in STEP 1.

Are you ready rock painters???  Let's get started!


 DIRECTIONS


Read and follow the written directions in each STEP, and watch the videos linked in each STEP below for visual demonstrations.

__________________________________________________________________________________

STEP #1

Watch the video below entitled...

Gardening Animals Rock Painting - PART 1 

 "How to Transfer an Image with White Paint and Mod Podge"


In the video above, I demonstrate how I transferred an image printed from my inkjet printer and transferred it onto a garden rock using white acrylic paint and Mod Podge in what I like to call my 'White Paint & Mod Podge Image Transfer' method.

Watch the video above and refer to the 'Description Box' underneath the video to learn more about the process demonstrated and to get links to other informative sites to help you paint your rock.

Some of the sites in the Description Box are also linked on this page for your convenience.

RELATED INFORMATION that you may find helpful:

"Learn How to Find and Print Any Picture from Your Computer"

"How to Transfer an Image to a Rock


__________________________________________________________________________________

STEP #2

Watch the video below entitled...

 Gardening Animals Rock Painting - PART 2

"Revealing the Image"


Believe it or not, a regular sheet of computer paper has many layers, approximately seven I believe.  That’s a lot of layers for a thin piece of paper!  Doesn’t seem possible, but it is true.

For this rock painting, I printed my image onto freezer paper because I have found that freezer paper gives an even better transfer of the ink to the rock's surface (as compared to regular computer paper).


"Revealing the Image" - PART 2


In the video above (PART 2), I will demonstrate how to remove the freezer paper from your rock to reveal the ink that will give you a base image to paint over.

You will have already transferred the image onto your rock when this video begins (refer to STEP #1 section above).

After you watch PART 2 above, refer to the information outlined below in this section for written instructions (numbered 1, 2 and 3) which will further detail what you will see in the video.

This is one of the first paintings I did using freezer paper to transfer the ink from the image onto the painted white surface of the rock.

However, I want to mention again here that regular computer paper will work too using the method outlined in this rock painting tutorial.  I liked the image transfer outcome with the freezer paper better, but both kinds of paper do work.

In addition, after you watch PART 2 Revealing the Image, you will also find more information in the 'Description Box' section below the video itself on my YouTube channel.

Just click the little gray arrow underneath any video to access the information and supply lists for the project.

RELATED INFORMATION: 

You may want to watch "How to Make Freezer Paper Sheets for your Inkjet Printerif you haven't already done so to find out how you can make your own sheets for your printer.  But please remember that they do come in pre-cut sheets that you can purchase here.


This is what the rock's surface will look like when the paper is rolled off

 This is what the base image will look like after the paper is removed layer by layer, WOW!


Here is an outline of the steps demonstrated in PART 2 "Revealing the Image" above...

1)  After your image has dried face down onto the rock (refer to STEP 1 above), take a flat head paint brush and some clean water, and coat the image with the water allowing it to sort of saturate the back side of the image.  As you coat the image, you will see the ink start to show through and you will be able to see details of the image.  So much fun, it’s sort of like magic!

2)  Allow it to dry.  Repeat this step of coating the back side of image with water and allowing it to dry in between coats at least 5 more times (you may have to do it more than that).  After the first few times, you should see the paper starting to roll off in layers as it beads up.  You can move these pieces off the rock GENTLY with your finger but be careful not to roll too hard or you may remove the ink at this point.

Tip:  Before you roll the paper off with your finger, let it dry a bit.  In other words, don't roll with your finger when it's too saturated.  Wait about five to 10 minutes after soaking the image,

3)  After doing the above in STEP 2 numerous times, gently roll the paper off of the image using your index finger.  The ink has been transferred to the white paint!  If you followed all of these directions, you should have a good base image to add color to your rock by using your permanent markers or artistic paint pens.


RELATED INFORMATION:

How to Transfer an Image to a Rock - "Fairy & Unicorn Image Transfer Using White Paint and Water"


 __________________________________________________________________________________


STEP #3

Watch the video below entitled...

Gardening Animals Rock Painting - PART 3

"Using Paint Markers to Apply Color"


In this video, PART 3, I will demonstrate how I use paint pens to enhance the colors on my rock creation.

After you watch PART 3 above, refer to the information outlined below in this section for written instructions (numbered 1, 2 and 3) which will further detail what you will see in the video.

Before using the paint pens to add color to the base image, I went over some of my images using a Deco Color Broad Line Opaque Paint Marker (white).  This is not a necessary step, but I like to do it this way because I feel it makes the painting my own creation.

The white paint from the marker needs to dry thoroughly before adding the color from the paint pens or Sharpies. Here is a picture of how it should look AFTER the Deco paint marker is applied and dried...


As you can see from the picture, the shiny white sections have been covered with Deco paint.


1)  After the image has been transferred, you might want to go over some of the images with an opaque paint marker.  Doing this will provide a smooth surface to the image and will enable you to add color with your paint pens or Sharpie markers very easily, and with the white background from the paint marker, the colors will be look more vibrant.

2)  Using an opaque paint marker go over any images or backgrounds that you would like to add more color to.  Wait for the white paint to dry.

3)  After the paint is completely dry (wait at least ½ hour after application), refer to your picture to select paint pens that are similar to the original colors and fill them in.  Use an Ultra Fine Black Sharpie to add details like eyes to the little animals and also to outline anything on your rock.


__________________________________________________________________________________

STEP #4

Watch the video below entitled...

 Gardening Animals Rock - PART 4 

"Adding Stenciled Flowers to Outer Edges of your Rock Painting”


In the video above PART 4, I will demonstrate the use of stencils in rock painting.

Stencils are a great tool to add other images to a rock painting.  Use a small flower and leaf stencil to add to your rock’s edges. 

Adding additional flowers and leaves to the outer edges of a rock gives the finished rock painting depth, character and originality.

In order to do this, I used a self-adhering flower stencil and moved it around the edges to trace the leaves and flowers.  After tracing them onto the rock, I simply colored them in with my Sharpie markers.


__________________________________________________________________________________

STEP #5

Watch the video below entitled...

Gardening Animals Rock Painting - PART 5 

"Adding Color to Your Rock Using Paint Pens & Sharpies"


This step might seem to be similar to PART 4 as it demonstrates the use of stencils in rock painting.  I would just consider it an addendum to PART 4.

Here in PART 5, I will demonstrate how to add small flowers and leaves to the outer edges of my rock to add depth and color using art markers.

You can use stencils to trace the flowers and leaves but if you don't have a stencil, you can just add them freehand because they are not that difficult to draw.  Just follow the directions below...

To draw flowers and leaves freehand use a thin black fine point Sharpie to make a flower by just drawing a small circle surrounded by 5 loops.  A small leaf is just two brackets "( )" connected.


SUPPLIES:

Mod Podge Matte Gel Medium https://amzn.to/2Xh1idD

Painting Flowers on Rocks https://amzn.to/2Zwl87g

White acrylic paint https://amzn.to/3b4d00G

Paintbrushes https://amzn.to/3d6uScL

Reynolds Kitchen Freezer Paper https://amzn.to/2TTT1M6

Inkjet Printer https://amzn.to/391bXx7

Arteza Paint Pens https://amzn.to/3cqpEYt

Sharpie Permanent Markers https://amzn.to/3eStQ4a

Sharpie Ultra Fine Black Marker (for outlines) https://amzn.to/2DOIkot

Art Markers https://amzn.to/30waJIX

Shuttle Art Markers https://amzn.to/31p8SoI

Peel and Stick Flower Stencil https://amzn.to/2C83JZo

Leaf and Ivy Stencil https://amzn.to/3km2vv7


Links to some of my PINTEREST Boards that may interest my crafty friends:


Hand Painted Rocks by nancymaggielee

Stained Glass Painting & Glass Crafts

The Art & Craft of Stenciling

Decoupage

Fairy Jars


Illustrations & Drawings

https://www.pinterest.com/nancygirlrocks/illustrations-drawings/

Mason Jar Crafts

https://www.pinterest.com/nancygirlrocks/mason-jar-crafts/

Image Transfer

https://www.pinterest.com/nancygirlrocks/image-transfer/

Water Color Clip Art

https://www.pinterest.com/nancygirlrocks/watercolor-clip-art/

Sharpie Crafts

https://www.pinterest.com/nancygirlrocks/sharpie-crafts/


See most of my PAINTED ROCK ART here:

https://www.pinterest.com/nancygirlrocks/hand-painted-rocks-by-nancymaggielee/

Learn How to Hand-Paint Flower & Fairy Garden Rocks

https://feltmagnet.com/painting/hand-painted-rocks


Looking for a fun gift for someone in your life? Check out my Zazzle store... https://www.zazzle.com/store/maggieleeflowers/products

I have t-shirts, coffee mugs, Christmas ornaments, phone cases, office accessories, just to name a few!


Please visit my WEBSITES:

Crafty Girl Rocks

Crafty Girl Decoupage

Hand-Painted Flower & Fairy Rocks 

Hand-Painted Rocks

Painting Rocks! (You are HERE)


RELATED ARTICLES & INFORMATION:


Printing Commands Tutorial for Printing onto Freezer Paper
(also calledLittle Boy in Bunny Costume Rock - PART 2 - "Printing Extra Flowers onto Freezer Paper"


Here are the links to other rock painting tutorials on this blog:

Some of my PINTEREST boards that may interest my crafty friends:

Hand Painted Rocks by nancymaggielee 

Stained Glass Painting & Glass Crafts

Rock Art 

Image Transfer

Water Color Clip Art 

Sharpie Crafts


Looking for a fun gift for someone in your life? Check out my Zazzle store... I have t-shirts, coffee mugs, Christmas ornaments, phone cases, office accessories, just to name a few!


Please visit my WEBSITES for more information about ROCK PAINTING:

Crafty Girls Rock

Hand-Painted Flower & Fairy Rocks

Hand-Painted Rocks

Painting Rocks!


Thanks for watching and just remember...

Be creative and be happy!


Please visit my other blogs (click link below each blog's cover picture)...


You can now buy rocks online!

You can now buy rocks online!
These are great for a rock painting party! (click on picture)