
Fairies & Bunny Spring Rock
Hi and welcome to my rock painting blog! Thank you for joining me for this rock painting tutorial, it is my hope that you will find it fun and informative.
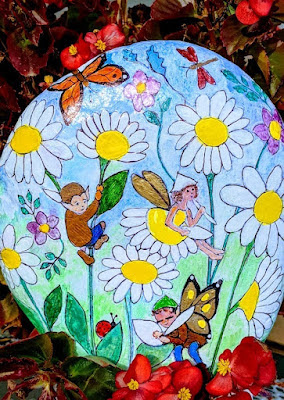
If you follow the directions outlined below, you will be able to create a rock just like the one pictured here...

Before you begin
with the detailed Step
#’s below, you should do the following…
1. Find a rock you
want to paint, making sure it's the right size and shape for your image.
Wash and dry your rock.
2.
Paint the rock with two coats of white
acrylic paint with
a foam paint brush.
3. Select a picture you would like on your rock and print it out onto freezer paper.
You may want to watch the videos and read the articles in the section below for more information about these pre-steps...
____________________________________________________________
To learn how to find and download any image into a word processing document, resize it and print it out refer to the following article:
“Learn How to Find and Print Pictures after Downloading into Word Processing Documents” https://www.craftygirlsrock.net/2020/07/learn-how-to-find-and-print-pictures.html
Learn how to make your own freezer paper sheets (from a large roll of Reynolds Kitchen Freezer Paper) to print on, watch this video: “How To Make Freezer Paper Sheets for Your Inkjet Printer” https://www.youtube.com/watch?v=0EYCIbkP9lo
How to Transfer an Image Using Freezer Paper - "Making Freezer Paper Sheets" https://www.youtube.com/watch?v=tD2YLpSrsaY
Learn how to print an inkjet image onto freezer paper, after which the image can be transferred onto a smooth surface: "Printing Commands Tutorial for Printing onto Freezer Paper" https://youtu.be/E1F_Bo_z0LM
“How to Transfer an Image to a Rock Using White Acrylic Paint and Mod Podge” https://www.youtube.com/watch?v=mkw4RLWs_sk
*Please note the following:
- The video links above may also be linked below in the STEPS, however, I just wanted to group them together in the beginning of this post so that you can get a general idea of what the procedure is.
- Also noteworthy, the video links above in this section will most likely be from different rock painting tutorials so the image may be different, but the procedure will be the same. This is just pre-information linked together for your convenience and to reference throughout the tutorial.
____________________________________________________________
So, now that you have a general idea of what is involved and you have watched some of the above videos, you are ready to begin!
Are you ready to paint a beautiful rock??? Let’s go…

STEP #1:
Deciding on an image and designing the rock in your mind
There are so many pictures available on the Internet that this may very well be the hardest part of your rock painting!
I love painting flowers and fairies on my rocks, you may like to paint birds and butterflies. There is no right or wrong way because there are no mistakes in crafts!
Whatever you want to paint on your rock, using the method outlined in this blog post will require finding an image to transfer first and in order to do that, I have linked an article below this paragraph for your reference on this process...
“Learn How to Find and Print Pictures after Downloading into Word Processing Documents” https://www.craftygirlsrock.net/2020/07/learn-how-to-find-and-print-pictures.html (you may have already read this because it is included in the pre-steps section)
After you have found the image, you are going to transfer, you will print it out onto freezer paper (see STEP #2).
STEP #2:
Print your image onto freezer
paper and transfer picture to your rock
Paint
your rock’s surface with two coats of white acrylic paint, allowing each coat to dry in between.
If
you don’t have pre-made sheets of freezer paper to print on, then you will have
to make your own from a large roll of Reynold’s Kitchen Freezer Paper. Follow the instructions in the video linked here to do that…“How to Make Freezer Paper Sheets for an Inkjet Printer”
After you make your freezer paper sheets (or purchase them) you will be ready to print your picture onto freezer paper by following the instructions in the video linked here... "Printing Commands Tutorial for Printing onto Freezer Paper".
Remember to print the image in reverse because it will be dried into the Mod Podge face down. You can reverse the image in the print commands on your computer before printing.
Here is a picture of the image printed on freezer paper that I used for this rock painting before I transferred it. Also shown in the picture below is the rock which was painted with white acrylic paint...
 |
Image printed on freezer paper and the rock it was transferred to |
After you print the image out and the ink printed on the freezer
paper has thoroughly dried (wait 24 hours), use a paint brush to coat the face of the image (inked
side) with Mod Podge Matte Gel Medium. Let the Mod
Podge dry (it will dry clear so don’t worry if it looks white upon
application).
Paint
another coat of white acrylic paint
onto your rock surface. Do NOT let this coat dry before the next
step (see STEP #3).
STEP #3:
Place the Freezer Paper Image
onto Rock’s Surface to Dry
Place
another coat of Mod Podge Matte Gel Medium onto your picture that already has one coat of Mod Podge dried to
it. Do
NOT let this second coat dry before the next step either…
While
both the rock’s surface and the picture are wet with their respective coats of white paint and Mod Podge, turn the image printed on the freezer paper upside down
and position the inked side (which
is currently wet with the Mod Podge) face
down onto the rock’s surface (which is currently wet with white paint).
Try not
to move the paper at all because this will smudge the ink. Once it is in place, secure the paper to the
rock using scotch tape to hold it
steady so that it won’t slip. Rub the
back side of the paper gently with
your fingertips and smooth out the paper.
Make sure every part of the inked surface of the picture is touching the
rock’s surface.
Let it
dry overnight.
After
the image is thoroughly dried onto the rock’s surface you are ready to reveal
your image (see STEP #4).
STEP #4:
Reveal the Image by Peeling off the Paper
As I stated above in the last paragraph of STEP #3, you should now be at the point where the ink from your image has dried into the paint on the rock's surface.
Now we have to get the paper off which can be a bit time consuming. However, if this step is done correctly, you will have a great image to work on so take your time and be patient with this step.
Interestingly, one sheet of computer paper has seven layers! So, we will have to take it off layer by layer.
To start this process, you will need a paint brush and some clean water. Dip the paint brush in the clean water and then apply the water to the back side of the image (which is facing up).
You will see the image start to appear once it is wet. Isn't that fun?? I think it is anyway, lol! This wetting/drying process is loosening the top layers of paper at the same time leaving the ink on the rock's surface for you to use as a base image for your painting.
Repeat the process above at least five more times. Make sure you let the water dry in between applying it. Around the sixth time you coat the back with water you should start to see little pills of the paper come off.
Let it dry once this 'pilling' starts. Continue to rub the paper off gently with your index finger until most of it comes off and you have a good base image.
Once the image is easy to see and most of the paper is off, you are ready to color it in with your art markers or paints!
SUPPLIES:
8.5
"x 11" Freezer Paper Sheets https://amzn.to/39zebEZ
(*optional)
Reynolds
Kitchen Freezer Paper https://amzn.to/2TTT1M6
Double-Sided
Scotch Tape https://amzn.to/3bQM1Xw
Rocks
for Painting https://amzn.to/2YmClyT
Inkjet
Printer https://amzn.to/391bXx7
Computer
Paper https://amzn.to/3ir89L1
Mod
Podge Matte Gel Medium https://amzn.to/2Xh1idD
Painting
Flowers on Rocks https://amzn.to/2Zwl87g
White
acrylic paint https://amzn.to/3b4d00G
Paintbrushes
https://amzn.to/3d6uScL
Arteza
Paint Pens https://amzn.to/3cqpEYt
Sharpie
Permanent Markers https://amzn.to/3eStQ4a
Sharpie
Ultra Fine Black Marker (for outlines) https://amzn.to/2DOIkot
Art
Markers https://amzn.to/30waJIX
Shuttle
Art Markers https://amzn.to/31p8SoI
Peel
and Stick Flower Stencil https://amzn.to/2C83JZo
Leaf
and Ivy Stencil https://amzn.to/3km2vv7
Deco
Art White Paint Pen https://amzn.to/2DzQX6D
Paint
Markers https://amzn.to/2XGYzep
____________________________________________________________
Supplies
Sidenote: Not all of the above products will be needed
for this particular tutorial. I have linked to some supplies that I use in my
rock paintings so that you can have access to some of my favorite products, but
you can find most of these in your local craft store.
Some of my PINTEREST boards that may interest my crafty friends:
Hand Painted Rocks by nancymaggielee
Stained Glass Painting & Glass Crafts
Looking for a fun gift for someone in your life? Check out my Zazzle store... I have t-shirts, coffee mugs, Christmas ornaments, phone cases, office accessories, just to name a few!
Please visit my WEBSITES for more information about ROCK PAINTING:
Hand-Painted Flower & Fairy Rocks
____________________________________________________________
RELATED VIDEOS & INFORMATION:
Fairies & Bunny Rock Painting Tutorial - PART 1 - "Printing the Image from a WP Document" https://youtu.be/cq5R-ZvjpA0
Fairies & Bunny Rock Painting Tutorial - PART 2 - "Applying the Image to the Rock Surface" https://youtu.be/46_gARkR9E0
Fairies & Bunny Rock Painting Tutorial - PART 3 - "Revealing the Image" https://youtu.be/vVFsXazOeMI
Fairies & Bunny Rock Painting Tutorial - PART 4 - "Making the Image Pop" https://youtu.be/wgql1kb3u1w
Fairies & Bunny Rock Painting Tutorial - PART 5 - "Rolling off the Paper" https://youtu.be/4CxAuhe9CUA
Fairies & Bunny Rock Painting Tutorial - PART 6 - "Adding Extra Flowers with Mod Podge" https://youtu.be/z6FCsR_pkSQ
Fairies & Bunny Rock Painting Tutorial - PART 7 - "Revealing Extra Flowers by Peeling the Paper"https://youtu.be/wi95ZG6T5tk
Fairies & Bunny Rock Painting Tutorial - PART 8 - "Adding a Stenciled Butterfly Outline" https://youtu.be/5_w_u1855mU
Fairies & Bunny Rock Painting Tutorial - PART 9 - "Coloring in the Rock Using Paint Pens" https://youtu.be/b-JPowOhyfc
How to Transfer an Image Using Freezer Paper - PART 1 - "Making Freezer Paper Sheets" https://www.youtube.com/watch?v=tD2YLpSrsaY
How to Transfer an Image Using Freezer Paper - PART 2 - "Revealing the Image" https://www.youtube.com/watch?v=-CuV6uOiVBY
To learn how to find and download any image into a word processing document, resize it and print it out refer to the following article:
“Learn How to Find and Print Pictures after Downloading into Word Processing Documents” https://www.craftygirlsrock.net/2020/07/learn-how-to-find-and-print-pictures.html
Learn how to make your own freezer paper sheets (from a large roll of Reynolds Kitchen Freezer Paper) to print on, watch this video:
“How To Make Freezer Paper Sheets for Your Inkjet Printer”
https://www.youtube.com/watch?v=0EYCIbkP9lo
Learn how to print an inkjet image onto freezer paper, after which the image can be transferred onto a smooth surface:
"Printing Commands Tutorial for Printing onto Freezer Paper"
“How to Transfer an Image to a Rock Using White Acrylic Paint and Mod Podge” https://www.youtube.com/watch?v=mkw4RLWs_sk
____________________________________________________________
Here are the links to other rock painting tutorials on this blog:
ROCK PAINTING TUTORIAL #1 - A Basket of Pansies

ROCK PAINTING TUTORIAL #2 - Gardening Animals

ROCK PAINTING TUTORIAL #3 - Red & Orange Poppy Flowers

ROCK PAINTING TUTORIAL #4 - Little Boy in a Bunny Costume

ROCK PAINTING TUTORIAL #5 - Mama Bird & Chicks

ROCK PAINTING TUTORIAL #6 - Fairies & Bunny Spring Rock

ROCK PAINTING TUTORIAL #7 - Beach Bunnies Family Rock

ROCK PAINTING TUTORIAL #8 - The Candy Corn Family

ROCK PAINTING TUTORIAL #9 - Daffodils Rock

ROCK PAINTING TUTORIAL #10 - Fairies & Daisies
ROCK PAINTING TUTORIAL #11 - Strawberry Fairy Rock

ROCK PAINTING TUTORIAL #12 - How to Paint a Rock Using a Coloring Book Page

ROCK PAINTING TUTORIAL #13 - Daisy Flower Rock

ROCK PAINTING TUTORIAL #14 - Stained Glass Angel Theme

ROCK PAINTING TUTORIAL #15 - Fairies in Love

Thanks again for visiting! I hope you enjoyed this tutorial and hope to see you again soon. And remember...
Be creative and be happy!
No comments:
Post a Comment